Tuesday, December 25, 2012

Merry Christmas!


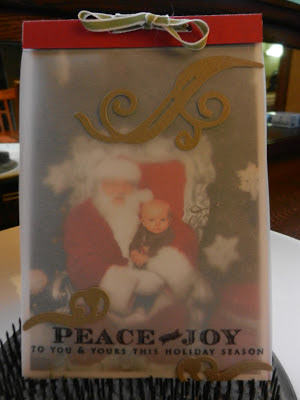
Merry Christmas and Happy Holidays!  Here's our little guy with the big guy!  He told Santa he wanted binaculars, luckily santa delivered! 


Just a quick post this morning to show you our holiday card this year.  This was my favorite picture this holiday season (despite the blur around his little fingers and nose) and we turned a similar pose into our Holiday Card this year.


It is a spin on the ever so popular chalkboard art going around pinterest this year.  I love it.  It was {fairly} simple.  You emboss white powder on black cardstock and then follow behind with some white pigment ink (off center it just a tad to give it a shaded effect).  Then use a white colored pencil to doodle wherever you want!  Fun.  Full details on this technique can be found on Paper, Scissors, and Superheroes

Have a great holiday everyone and see you back here soon!

Monday, December 24, 2012

Last Minute Gifts


Hi Everyone!  It is Christmas Eve and we're enjoying our family holiday celebrations.  With our son being four this year the holidays have been a lot of fun.  He has gotten into enjoying Christmas music and I REALLY enjoy listening to his versions of classics.  Feliz Navidad is Feliz Naneena and Jingle Bell Rock is Jingle Bell Rocks.  I often have "Dradle Dradle Dradle" singing through my head after I leave a room that had him in it.  Our Elf, Udie (named after the song in Dora the Explorer), has been finding herself in a lot of silly places and effectively working when the naughty bug kicks in. 

During this busy time of year, I don't find a ton of time to craft but I do squeeze some time in here and there.  I did hold my annual holiday gift giving class for my card class girls earlier this month.  It is always a popular class because it is a great chance to make quick and easy gifts for co-workers, teachers, neighbors, etc.  Earlier this month I showed you the chalkboard ornament that doubled as a gift card holder but today I thought I would share with you a few other gifts I made this holiday season.


I made this "Merry" banner using an old Little Golden Book that was Christmas themed.  I love Little Golden Books, they remind me of my childhood.  I remember having a shelf full of them.  They are also really cheap and easy to find now at thrift stores and used bookstores.  The letters were made using my slice machine.  I used the same concept I use for my superhero and princess banners, you can find those on my Etsy Shop (for those of you keeping track, the superhero banner is by far still the favorite over the princess banner!).  I also have this cute little "Merry" Banner posted in my shop if you are looking for a cute decoration for you or a loved one.

Next up is a little Petri dish (found at the Dollar Store) filled with Ju Ju Coins and  decorated with "Rudolph's Spares" on the cover.  I saw something very similar online (sorry, I don't have the original link) and knew we had to create this quick and easy gift in class.  It is just a fun way to package a little candy for your recipient.


This one is my favorite (and just between you and me, it won't be gifted to anyone because I'll be keeping it for myself).  It is some Peppermint Bath Sugar and smells heavenly.  You can find the recipe all over Pinterest.  I adapted mine and used some seasame seed body oil instead of the expensive almond oil that is hard to find.  It smells great and leaves your skin feeling nice and soft.  Half of the recipe was dyed with red food coloring and layered in the jar together to give it a nice candy cane look. 


Of course who would ever say "no" to a glass Santa filled with chocolates?  He is even harder to resist with that cute gift tag!  There is enough cuteness here to make you want to break that newly formed New Year's resolution before it even starts. 


Everyone could use a few more gift tags!  These use the hot trendy washi tape that you can find EVERYWHERE right now (including Target!). 


Next up: old school milk carton containers.  One is holding hot cocoa and the other is holding peppermint marshmallows.  Two neccessities when the weather gets cold around here.


And last but not least, I modified this coffee cup card template I saw on Stamsnsmiles blog so that the template opened from the top to hold a surprise gift card.


To make it even more special, I sewed up this quick coffee cup cozy on my sewing machine.  Seriously, this is a project you can have done from start to finish in under one hour (including the sewing time).  I used the cup cozy template that I found on Hawaiian Paper Doll but I did make it about 1/4 inch bigger on the top and bottom and about an 1/2 inch longer on each of the sides.

That's all for now!  I hope you and your family have a great (and safe) holiday this year!  See you soon, I got to take a break to get ready for Santa's big appearance tonight!   

Sunday, December 2, 2012

Cheap & Easy


What is cheap and easy?  This gift, silly!  Unless you live under a rock, you know how hot pinterest is right now, and if you have ever spent more than a moment on it you also know how hot chalkboards are for EVERYTHING!  They are the "it" trend right now.  

Of course, I had to create my own version of this cool trend [yes, I cave easy to peer pressure].  I made this ornament using white embossing powder and white pigment ink.  You can go to Betsy Veldman's blog post, Chalkboard Art Meets Stamping to get her full tutorial on creating your own mess free chalkboard art creation.

It gets better.  My chalkboard ornament has a double life.  While it can hang on a door knob as decoration:


It also serves as a gift card holder for $10 off at local restaurants (cleverly hidden on the backside) :


All for only $5.  See what I mean?  A cheap gift (with lots of bang for your buck) and easy (because I make it for you)!  If you live in Milwaukee and need a cheap & easy gift, you can purchase this item from me for only $5/each (I'll ship it to you for free).  The ornament comes with a $10 off coupon at one of these Milwaukee restaurants (more details on the coupons can be found at citytins.com):  


You even get to pick what restaurant you want (first come first serve of course so hurry before your favorite food spot is gone!).  This will make the perfect gift for a teacher, co-worker, neighbor, postal employee, hairdresser...I could keep going.  Heck, at this price, buy it for yourself (I won't tell).  

If you don't live in Milwaukee, go ahead and make yourself a cheap and easy gift this year!

Thursday, November 29, 2012

No Spend Month Wrap Up

Family Shot: Halloween 2012
I can't believe how long it has been since I posted!  Geez, I've been busy.  I'm not even sure with what, I certainly don't feel like I have accomplished much in the last several weeks.  I guess growing a baby takes a lot out of you!  I've spent most days working my hinder off at the office and have come home too pooped to do much more than the basics.  Most nights I don't make it to 10pm, my husband would tell you some nights I don't make it till 9pm (I think there were a few nights that I beat the 4 year old to bed).   For those of you that are fans of Modern Family, last night's episode was about "pregnancy brains".  I've been experiencing a mild case of that lately.  Latest proof was found in my fridge tonight when I decided to store the ice cream in there last night.  I was really looking forward to eating that ice cream tonight.

My Pregnancy Brain sabotaging me.  I was looking forward to eating that ice cream.
We did make it through our "No Spend" Challenge.  No tears were shed but I have to say, I am so HAPPY it is over!  That was not easy!  We spent a total of $418.  Certainly, we went well over our $250 allotment but if I take gas purchases out of the picture (which I really probably should have done given that our cars are not an option), we only spent $254.  Woot!  Woot!  I'm going to call that a success!  We accomplished this by eating a lot of cheap simple meals.  Meals like: eggs, grilled cheese, lots of rice side dishes.  We also ate lots of staples from our pantry and freezer, some of them were past their "expiration" (do noodles really expire?).  We also rarely ate out (unless someone else was paying) and kept ourselves entertained by doing "free" stuff, like going to the zoo (we already have a membership), visiting with family, and playing outside at the park.
J as a Monster for Halloween 2012
I crafted almost exclusively using supplies that I already own, forgoing Papertrey Ink's product release on the 15th.   That's a HUGE sacrifice people, especially with the holidays sneaking up on us as fast as they always do.  I was still able to make my son's Halloween costume and stick to budget.  This year he was a monster. I spent a total of $9 ($7 on the sweatshirt and $2 on the ping pong balls), everything else for his costume came from my craft supplies already on hand.  I'd say the costume was a success and I'm super happy he decided against going as a frog, I had no idea how I was going to make that happen.  

J's cute monster tail
Our best week was our last week and a half, which I find to be completely odd since I thought that would be the hardest week of all of them.  We only spent $79 that week ($29 of that on gas).  I did exclude a $30 dog food purchase.  Our dog doesn't eat the way it is, I really didn't need to purposely starve him for the purposes of this challenge.  Don't worry, he was as happy as a clam, I was trying to prolong his food purchase as long as possible and he got cans of wet dog food that we had laying around the house.  For a dog that doesn't eat, I've never seen him so happy!  He had no problems eating on wet dog food days, what a stinker.

I'm happy we did this challenge.  I feel a little better going into this holiday season of spending with the previous month of "no spend" behind us.  This may or may not become an annual event for us.  I have almost a whole year to figure that out.

Monday, October 29, 2012

Fifth Holiday Card


Ever since having a child, I have found it a MUST to have a picture of my cute little guy on every holiday card I send out.  Let's face it, nobody cares about the hubby or myself, they want to see our son.  I can't blame them really, he is the cutest kid ever (I know, that title is claimed by every mother out there!).

I love this photo card that Nicole Heady did a few months back and it provided me with my inspiration:


I feel in love with this card the moment I saw it.  It is so simple, classic, and pretty.  My card has similar elements to it, a nice peak-a-boo cover and simple colors but I finished my very different.


Mine is a three part card.  The first layer is the vellum paper as you see pictured above.  It offers a good first glance and the little treasure hiding underneath. 

The next layer is the photo layer, backed by a nice piece of cardstock to give it some heft, see isn't he just the cutest?  This is him with the big guy when he was 9 months old (I think, time really has a way of sneaking past you, he is four now):  


The third and final layer has the sentiment stamped on it:


I love this card and I bet if you made a similar card with your cute kids incorporated into it, that your friends and family will cherish the card well after the holidays have past!  

I hope you all have enjoyed these five holiday cards and seeing where I got some of my inspiration and ideas from.  I've enjoyed sharing them with you all!  I'm wrapping up my "no spend" challenge this week and have a need to dust off the sewing machine and make a couple holiday gifts because before you know it.....they will be here!  


Sunday, October 28, 2012

Day 4 of Holiday Cards


Here is a look at my fourth holiday card where I am showing you how I came up with the designs.  Sorry for the delay.  This post should have been out last night but this momma was exhausted.  We took our four year son to the zoo last night for trick-or-treating.

There was this family of three there who's kid whined the whole time.  We kept seeing them in every building we went too.  We just couldn't shake them.  At one point the kid was crying belligerently about wanting popcorn.  Get your darn kid some food, man were they annoying.  That family was US!  We took our four year old hungry....trick-or-treating......for candy!  Man, was that dumb.  Clearly neither of us thought that night through very well.  So when we got home from what was supposed to be a fun night out, we were all tired, cold, and crabby (except the kiddo, of course he was fine once he had food in his belly).

Anyway, back to the purpose of this post.  My fourth card design in a series of five.  These are all holiday cards and I'm showing you where I got the original inspiration from so you can see how sometimes I only pick certain elements of a card,sometimes I pick up the whole theme, and sometimes a I just make it up all together.

Today's card came from this design by Maile Belles:


I loved the corners of this card and wanted to do something similar.  I turned her card design into this:


One element on the cards is this same but the finished cards look very different.  I love the scrolls in the corner, they add so much detail.  The light green is achieved by "stamping off" first.  That means you ink your stamp, stamp it on a scrap piece of paper and then stamp on the finished paper without re-inking the stamp.  Super easy technique and it always gives great results.


I die cut and stamped a pretty red poinsettia in the middle and added a little gold bling.  Done! 

That wraps up day number 4!  I'll be back tonight with my final project which incorporates a photo into the card.  Until then, we are attempting more trick-or-treating today.  We'll be sure to eat before we go!  

Saturday, October 27, 2012

No Spend Week 3


This week has proven to be the toughest.  I have had weak moments where I really just want to say, "screw it", but I haven't.  I'm sticking with it.  I'm sure addicts have similar feelings when they try to quit smoking, just on a much more intense level or like when you try to go on a diet:  the first week is easy because motivation is high but as the weeks go on, it gets tougher and tougher to resist eating those hot fudge sundaes.  

While I feel I have been struggling, my husband has struggled even more, except he is stubborn and won't admit it.  He bought vacuum bags (even though I had already bought some) because,  "they were a good deal", a stand for his tablet because, "it was only $25", and a modem because, "it was a good deal".  Do you see a theme here?  We are in the middle of a no spend challenge, EVERYTHING is a bad deal!  I really want to buy some new fabric and come home and say, "but it was a good deal", but I'm a bigger person than that (I'll just whine about it on my blog).  :)

As hard as I try, I just can't control him.  One day they'll make a robotic husband that will listen to my every command, until then, I'll try to work around with him.

I did splurge this week and went out to dinner with friends.  I had a goal to only spend $10 while out and I didn't get even close to keeping that goal.  With tip, I spent $17.  I told myself I won't order a drink: I got tea.  I told myself I wouldn't get an appetizer: I got soup.  I did however buy the cheapest entrée listed on the menu, a fancy grilled cheese sandwich.  I would have been better off getting the expensive scallops dinner and skipping the drink and soup.  I certainly would have left more satisfied.  Lesson learned and notes made for next time.

There were some positives this week.  I made a great breakfast that really can stretch a buck and it was delicious too.


Cheddar Popovers


Makes 12 popovers

Ingredients
3 large eggs
1 cup all-purpose flour
1 cup milk (I used 1%)
1/2 teaspoon salt
1/2 teaspoon garlic powder
1 cup shredded sharp cheddar cheese
diced scallions

Directions
Preheat oven to 400 degrees.  Spray a standard size 12 cup muffin tin with non-stick cooking spray and set aside. 

Mix eggs, flour, milk, salt, and garlic powder in a bowl with a hand mixer (or whisk should work).  Pour batter in to muffin tin filling each cup 2/3 full.  Top each cup with cheddar cheese and scallions (skip the scallions for the picky eaters).  Bake for 20-25 minutes until tops are risen and firm and golden brown.  


Remove popovers from tin and cool on wire rack.  Brown up some yummy hash browns to eat along the side, these potatoes came courtesy of my dad's garden.

In total, we spent $141 this week.  Our worst week yet.  Here is the breakdown:

Gas:                      $49
groceries:               $18
vacuum bags:         $13
Ericka dinner out:   $17
Modem/tablet:        $44 

I'm excited about this final FULL week.  My husband reminded me that we need to go into a 5th week for a few days too {AUGH} since this month has 31 days.  We should have done this in February.

Friday, October 26, 2012

Holiday Cards Day Three


This one is going to be short and sweet.  This is a really simple card that takes little time to make but has big time results.  It is so easy to make this card over and over again.  I love the simplicity of this card.  

My inspiration came from Ashley Newhall's blog and this cute little card that she made:


Lots of similarities, right?  Even the color schemes are the same but yet different.  I love her card but I really love mine too.  Her card is soft and sophisticated.  Mine is bold and simple.

I can't wait to show you what I have lined up for tomorrow!  See you then.

Thursday, October 25, 2012

Holiday Christmas Card and October Blog Hop


You can read all about Papertrey Ink's October Blog Hop here on Nicole Heady's blog.  This month's focus was on color.  To be more specific, non-traditional colors.  I love this combo she pictured on her site:
Doesn't this scream vintage to you?  We all know vintage is in right now.  She has six different color combinations listed on her website but this one spoke to me.  It has a nice warm fuzzy feeling to it, which is exactly what we all want to be feeling during the holidays.

In addition to this color combo, this card I found on Melissa's Paperie blog, gave me inspiration to create my second card in my five day series.  Look how cute her card is (notice those chevron stripes again):

  Here's how I combined the two cards into my own design:


I used several different Papertrey Ink stamp sets and dies.  I die cut a tree from blue cardstock and used the negative portion on this card along with another Christmas tree that I die cut out and stamped with green ink.  I added those those cute little red birds and framed them all behind a fabulous frames die cut from Papertrey Ink.  I love this card and I love the color combination.  I hope you agree!  See you tomorrow night!

Wednesday, October 24, 2012

Holiday Chevron Card


I often get asked how I come up with my card designs.  Do I make them up on my own?  Do I copy other people's designs?  Do I get inspiration online?  Really the answer is ALL OF THE ABOVE!  I'm a huge blog reader.  I regularly read (subscribe to) over 90 blogs each day.  They range in topics from food, money, parenting, and of course crafts.  They are all over the place and I usually get a lot of my card inspiration from my favorites like:  Dawn McVey's, My Favorite Things; Nicole Heady's, Capture the Moment; Ashley Cannon Newell's, A New Design.

Some of my inspiration comes from pinterest.  I LOVE pinterest.  I am on this site daily pinning something and anything (varies just like my blog subscriptions).  Of course some of my designs come straight out of my head.  Not everything is a success, in fact, most of it doesn't turn out at all like I thought it would.

I thought I would spend the next five nights showing you a new card each night and showing you where I got my inspiration from.  This will help you see the original idea and what I turned it into.  Some of my finished designs are really close to the original while others are not.

I thought I would start with this chevron card I came up with.  Chevrons are all the rage.  Everyone is working with chevrons right now.  I love them.  They are super versatile.  The work well for both males and females.

Here's my little beauty:


 Here is the original project done by Danielle Flanders:


You can definitely see the similarities but yet they are really different.  I loved the colors she used on the card and I love the cute little pin accent.

Since my card will be made in large quantities (making for the holidays), the pin wasn't practical for expense reasons but I made my own bling by adding sparkly glitter to the end of my snowflakes and a jewel in the very center. I also used solid red cardstock but stamped tiny snowflake images on it in red to give it a little more dimension and character. 


I bought the digital paper on etsy.  I love buying paper on etsy and wished I started doing this years ago.  You only print-what-you-need, and with a small craft space like mine, it is so helpful!  This paper comes from Kylie Healey Designs and was only $3!  What a steal!

While I like my finished card, I still like the original by Danielle better but I'm always my toughest critic. Stay tuned for a new card tomorrow!  It will be a fun play on colors. 


Sunday, October 14, 2012

"No Spend" Week Two


Day 9-  I went grocery shopping and spent $13 on basics:  milk, cheese, onions, spinach, cream, garlic bread (yeah I know, the bread is probably not a basic).  I tried real hard to keep it at $10.  That garlic bread put us over the $10 mark but it will also be used for 3 separate meals so I'm not feeling too bad about buying it.  I find myself studying prices more than ever (which is half the point of this challenge, I think).  For example, I only needed 8 oz of mozzarella cheese for the meal I was making.  The store had three options:

8 oz brick on sale for $2
8 oz shredded on sale for $3
16 oz brick on sale for $3

I would normally buy the shredded cheese for the convenience but for only $1 more, I was able to buy enough for a whole second meal and at the rate my family goes through cheese, I have no concerns about it being put to good use.

Day 10-  We were doing great this week until today.  My hubby went to see Louis CK and bought a round a drinks.  The ticket was $45 and the round of drinks (for two) was $9.  Man, this hurt.  I really think he should have declined the invite but I think I would have also accepted the offer to go especially if it was someone like Tom Petty or Keb' Mo'.  This show cost us 18% of our allotted budget!  At least he had a good time.


Day 11-  We found out we're having a boy!!!!!!!!!!!!!!  Yeah!!!!!!!!!!!!  It was hard not to go out for ice cream to celebrate but we went home and I made chocolate chip cookies instead.  It was still special.  :)

Week Two is at a close and we spent another $100 of our $250 budget.  NOT GOOD.  Not good at all.  Here is the breakdown:

$19 Groceries (basics like bread, cheese, and milk)
$27 Gas
$54 Tickets and drinks at Louis CK Show

Take out the show and drinks and we'd be doing pretty good!  I'd say that's not too bad but with only  $52 left in our pockets and two weeks to go, I'm pretty sure we will be going over our $250 budget but we're still sticking with it to see just how close we can be.